THE FUEL TANK
Aim:For this assignment we are required to create a 1:1 scale template replicating one of the motorcycle fuel tanks supplied. We will using Software technology, laser cutting machines and techniques we learnt from assignment 1 to create an aluminium skin to adhere to a third of the fuel tanks contours.
Our chosen fuel tank: Harley 883 Iron fuel tank.


Next step, we used rhino to recap the 3D model and used slicer to slice the model. We tried two kinds of ways to slice the model.
STEP 2 --- Laser Cutting and Assembling the Template
Tools/Equipment:


STEP 3--- Mark the Section and Pattern making


STEP 4--- Shaping Metal


STEP 5--- finish
Joint the finishing pieces together and using aviation snips cut out any imperfections or overhanging pieces of metal from the aluminium in order to allow the pieces to fit together perfectly. All done.


Our chosen fuel tank: Harley 883 Iron fuel tank.

STEP 1---Make the Template
Tools/Equipment:
- 1:1 Tank example
- Camera
- Rhino
- Fusion 360 slicer
First we take photos of the fuel tank at different angles and have a measurement.


Next step, we used rhino to recap the 3D model and used slicer to slice the model. We tried two kinds of ways to slice the model.
STEP 2 --- Laser Cutting and Assembling the Template
Tools/Equipment:
- Laser cutter
- Glue
- Masking Tape
we exported 2D sheets into PDF file from slicer and put into illustrator,set the line weight and change colour into red for laser cut. Then using 3 mm thick board and laser cutter to finish template pieces.


After the template pieces was cut out from the laser cutter, we assembled it and glued together to be more stable. Then use the masking tape to wrap the model.


Tools/Equipment:
- Tracing paper
- Marker; pencil
- Scissors
- Aluminium sheets
- Guillotine
- Tin snips
We used tracing paper and normal paper covered our model, we divided the tank into 3 pieces: left, right and top with front. Then we follow the shape of tracing paper and mark them on the aluminium sheets with marker. Leaving approximately 10 mm on each side for shrinkage and any minor mistakes. After that, we use the guillotine to cut the big aluminium sheet into smaller pieces and then using tin snip carefully cut out the stencils.


Tools/Equipment:
- English wheel
- Various hummers
- Sandbag
- Plywood stump
- Metal scribe
- Vice
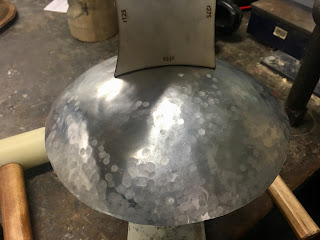
Once the shapes have been cut, we first marked the deepest area and identify the areas in which you need to change. That will be easy to do the work after and get a more refined outcome. Then, we use the large English wheel with the flat bit attached to creatures the main curved surface.
Keep move the piece back and forth, every time just slightly changing direction to keep the right shape of the model. Next, we used hummer to hit and shape the marked area of aluminium into the mould and get an initial shape. Also using a sand bag and fibre glass mallet to deeper hit the deepest area which we marked before. Then use the larger end of the rubber mallet and strike the metal sheet against the small cast iron ball to smooth the ripples, English wheel also help us to smooth the face. In all these steps, we have to check the shape and make sure it matches the template.


STEP 5--- finish
Joint the finishing pieces together and using aviation snips cut out any imperfections or overhanging pieces of metal from the aluminium in order to allow the pieces to fit together perfectly. All done.


评论
发表评论